How I replaced everything with Notion: Recurring Tasks and Wishlists

Things: To Do items and other projects

I’ve written before about how much I love Things, and that hasn’t changed. When it comes to organising and tracking daily tasks, Things is still my go-to. However, there were a couple of issues that I had begun to run into which were becoming counter-productive:

  1. Too many tasks, not enough organisation: Similar to what I had experienced with Evernote, while I was quick to dump all sorts of things I wanted to do into Things, it seemed like the ‘Someday’ and ‘Anytime’ pile were growing and growing into a huge, unmanageable mass. Piles of articles to read, videos to watch, and miscellaneous tasks. Even using tags, it was becoming a strange source of low-level anxiety, as I knew I would never get round to doing anything there.
  2. Recurring tasks never ‘completed’: Lots of the things I want to do are daily tasks, such as practicing Japanese, or making music. The problem with this was that most of my To Do list never really changed. I would tick off the checkbox, only to… immediately re-create it for the next day. It felt like a pointless exercise, and didn’t provide any of the satisfaction that I should feel upon completing a task.
Things Organisation
Eugh, what a mess.

What I realised was… neither recurring tasks or lists of videos to watch, articles to read, or music to listen to are actually To Do list items at all, but something quite different.

What I thought of as daily tasks are actually habits, rather than ‘to do’ items.

This was an important one. Realising this was liberating, as I could approach the issue differently – with a Habit Tracker.

My habit tracker within Notion.

There are various different kinds of habit tracker templates available, and I customised one that I found online (I can’t remember where now, sorry!). Each week I create a new table, and adjust the habits I want to focus on as appropriate. This not only allows me to more easily track and report on my progress – but also frees up my To Do list in Things for one-off, immediate tasks that need to be completed on a specific day.

Things to Read, Watch, and Listen to

As I mentioned, my Things ‘Anytime’ lists were filled with different articles I wanted to read, or videos I wanted to watch at some point, and it simply wasn’t working. Instead, I created different databases in Notion to gather and organise this stuff.

For example, here is my list of films to watch…

an excerpt from my Reading List (don’t judge)…

and my trimmed down YouTube list (filtering out the Japanese learning videos, as there’s so many of them).

The beauty of this is that I can organise them in a much deeper way with Notion, assigning tags, related URLs, authors, etc – and then sort/display them on that basis. Rather than facing a huge list of items to get through like when they were chucked into Things, I can now dive in to the specific database and find exactly what I want when I have some spare time. I can also add notes and ratings when I’ve actually read or watched them, which are also reportable/sortable.

Blog Post Ideas

Ideas for blog posts were another thing that I used to store in Things, which didn’t really work out all that well. The reality with blog posts is that they all exist at different stages – and are more like mini-projects than To Do list items to be checked off.

Now, I organise them as documents within Notion, like so:

Each entry acts as its own ‘page’, which can contain notes, images, etc, and I can assign tags depending on the status of any particular post (from idea, to ‘in progress’, to completion).

Again, doing this means that my To Do list is freed up and reserved for items which require action and completion in the short term – which brings added focus and clarity.

Visibility

Aside from the deeper meta-data capabilities that come with Notion’s database approach, there’s also something else which has proven to be invaluable, but also really simple… and that’s the visibility of the tasks.

While hard to capture in a screenshot, all of my different lists or projects can be displayed on my home dashboard in a neat, logical, organised way.. with a custom view as appropriate. This means that instead of dumping things into ‘Anytime’ or ‘Some Day’ in Things and forgetting about them, I can keep certain projects or items on my radar – without them becoming too intrusive or overwhelming.

Summary

Things is great, but trying to use it as a master tracking utility for everything simply wasn’t working for me. Offloading the larger and longer term projects to Notion, and having Things focus on specific things I need to get done on a day to day basis has made a huge difference. Give it a bash. 

Gherkin 40% – (Failed) Keyboard Build Log

In the past I’ve posted about some of my DIY mechanical keyboard builds, including the first I attempted, the Commodore 64 homage. Around about the same time as that build, I had been seeing these ludicrously tiny keyboards online which were 40% the size of a standard setup… with just 30 keys total. Naturally, curiosity got the better of me, and I decided to have a bash at building one.

The specific design I went for is known as the ‘Gherkin’, apparently because originally they were small and green. I wanted to stay close to this idea, and opted for a yellow colour scheme… Yellow PCB, yellow glow, yellow case… the works. There may or may not have been a splash of green in there. I wasn’t quite sure yet.

The Parts

I needed the following bits and pieces:

  • PCB
  • Switches
  • Keycaps
  • Diodes and resistors
  • A case
  • LEDs (for under the keys as well as to light up the case)
  • A microcontroller
  • IC Socket

I couldn’t face soldering in all of the diodes and resistors by hand, so I got a PCB with them already in place from /u/MrMontgomery on Reddit. He also sent over the LEDs, and the microcontroller that I would need.

For the case, I got a handmade yellow acrylic case from someone called /u/qlavier in Belgium. They make some beautiful things on their website, qlavier.com. I wanted an all acrylic case so the LEDs would really shine.

The keycaps were standard DSA profiled that I got dirt cheap on eBay from Hong Kong. Sticking with the Gherkin theme, I decided to do an alternating green and yellow pattern.

The Switches

The switches, of course, deserve a special mention, due to how important they are when building a custom mechanical keyboard. In the last build I went with Cherry MX Whites (Milky), which are pretty ‘clicky’, but not as loud as most others of that type. For this build, I had in mind that the Gherkin might end up as a travel keyboard due to its size… and I wanted the switches to be quiet, but also have a really good tactile feel to them. On top of that, I wanted them to support under-key LEDs, and to have a clear top to diffuse the light as much as possible. So eh, not too specific.

In the end I went with Kailh Pro Purple switches, which tick all of the boxes. They have a 50g actuation force, and aren’t quite as tactile as I might usually like, but they still feel pretty good. Plus, for some reason, in my head the purple colour seems to fit with the Gherkin theme. Don’t ask me why.

The Build

When I began the build, the guides available online were scant at best, and it was bit more complicated than the others I had taken on before. With advice from the folks at /r/mechanicalkeyboards I managed to figure things out in the end. However, ultimately it all became a nightmare, and I have shelved the project for now. Some specifics…

LEDs

First of all, you need to install the LEDs in place. This (perhaps obviously) is because they sit underneath the switches. The problem I immediately ran into was that I couldn’t find a schematic for the Gherkin PCB, and was unsure of what way the LEDs should go. MrMontgomery helped me out, in that the long leg of the LEDs goes into the hole with the round pad… and the shorter leg goes into the hole with the square shaped pad.

Gherkin LED build log

Switches

These were pretty straightforward. Put the switches through the acrylic top panel, through the holes in the PCB, and then solder them in place. At this point I really wished I had paid more attention to getting the LEDs straight, as they didn’t all immediately fit in the hole in the switches casing. I had to carefully bend them a bit, but they worked in the end.

Gherkin keyboard build log

Reset Button

This was another annoying bit. In order to flash the software onto the microcontroller, you have to create a connection between two of its pins to reset it into the required DFU mode. That’s fairly simple in theory… you can just solder two bits of wire to the necessary pins and then touch the ends together. In practice though, it’s a bit more of a pain. The reset function is something I found myself using a lot with my other custom keyboards, while you customise the layouts to something that works for you. This meant that I would have to find a way to easily trip the reset. In the end, I settled on a mini, yellow push button switch that just kinda flopped about. I toyed with the idea of an arcade button, but that would have been ridiculous, and wouldn’t have fitted in the case anywhere – at least not neatly. Of course, nothing runs smoothly… and the reset button didn’t work at all. For a while I had to resort to just manually shorting the pins, which was less than ideal.

IC Socket

Because of the design of the Gherkin, you need to install the Microcontroller after the switches have been soldered in. That causes some problems if you have a plate mounted case… or if you have any problems with the soldering that need fixed later. Why? Well, if you’ve soldered in the microcontroller directly to the PCB, you can’t get underneath it to de-solder the switches easily. For that reason, I was advised to use a (low profile) IC socket which the microcontroller just clicks into, so if needs came to it, I could just pop it out.

Gherkin MCU

With that in mind, I bought a 24 pin IC socket, trimmed it down to size (12 pins) and installed that. Unfortunately I immediately ran into some issues, as it appears the IC socket had gotten damaged somehow (probably when I trimmed it down) and the Pro Micro controller wouldn’t slot in properly. This turned into a bit of a saga, as it took me a bit of troubleshooting to realise that this was the problem.

De-soldering the socket was a nightmare for the reasons above, so in the end I clipped it off and soldered the controller directly onto the board, at which point I managed to get everything working, aside from a few keys. After rummaging around online, I found this incredibly helpful image which helped identify which pin was the problem:

Gherkin troubleshooting

Unfortunately, by this point my Pro Micro had been so abused by soldering and de-soldering that it couldn’t be trusted. I had to remove it, and try another. In true grand idiot style, I then ended up going through a few different Pro Micros as I soldered the header pins in wrongly… lost the microcontroller in a house move, and various other mishaps.

To top things off, I tried to remove a few of the switches to clean up the top side of the board a bit, and ended up breaking them. I put a new microcontroller on, and got things mostly working… (after realising I had forgotten to put the switches back on first… eugh).

Ultimately though, I was defeated. A couple of the switches just weren’t working, even when I shorted the pins on the board directly. The only thing I could figure was that I had damaged the traces on the PCB somehow, and that would mean essentially starting from scratch, soldering in a whole new set of keys… etc.

I’m pretty disappointed, as the Gherkin was shaping up to look pretty cool. However, it was a learning experience. I now understand what is and isn’t critical when building these boards, and have come to understand a lot more about how they actually work, which has been helpful. At the end of the day, the Gherkin was going to be more of a novelty board than anything especially practical, so I can probably live without it.

That said… I’m not really good at giving up on things completely, and since I still have the custom case etc, I’ll probably return to this one at a later date. Watch this space.

How I replaced everything with Notion

Knowing my penchant for a productivity tool, my good friend Pazy suggested I investigate one that I hadn’t heard of before: Notion. From what I could gather, it was a central place to store a whole manner of different kinds of notes.

I was initially a bit wary of diving head-first into Notion, as I have both used and built up a significant amount of content in Evernote over the years. However, the temptation was too much to resist, and I gave it a whirl. After just a short time, I was convinced. Notion is the promised land.

Notion logo

Coming from Evernote

While Evernote has been touted as the single place that you can quickly grab and throw all of your various ideas, links, clippings, and files that you come across on a daily basis – Notion takes that idea a step further. Rather than just acting as a huge repository with search capabilities, Notion encourages you to store information in a far more organised way, making heavy use of its own databases. At first, I found this a bit confusing, as my Evernote ‘save it all’ approach didn’t quite fit neatly… but once I realised that Notion involved a fundamentally different approach to data organisation, it made much more sense.

Databases versus Notes

I can already hear people turning off at the sound of databases. I was the same. Pazy is a database guru as part of his day job, so I just assumed he was naturally inclined to gravitate towards databases in his personal life too. However, Notion utilises and presents databases in a way that you wouldn’t even realise they were there unless you stopped to think about it. Essentially, rather than storing information in a text-note, you are gently prodded to put it into tables, with tags – all of which is presented in a logical hierarchical structure. Before you know what’s happened, you suddenly have the ability to organise, filter, and display your notes in a much more powerful and diverse way than would have been possible with the alternative.

To give a concrete example, as a musician I keep a note of tracks I have started working on, but which might not be finished. In Evernote, that looked something like this:

Notion for song tracking

and here is an excerpt of how it looks in Notion…

Song List Notion

Of course, Evernote can also present data in tables… but with Notion the key point is that the information is treated as a searchable database, rather than just text presented in a different way. With Notion, I can now quickly and easily see which projects are at which stage, and filter them depending on the different variables that I want to display.

For another example, I used to collect recipes to give me ideas for what I could eat on days where I lacked inspiration. In Evernote I would collect these by meal type, but in practice I found that the limited ways to filter these outside of just a plain search meant that I almost never referred to them. Now, they are stored in a dedicated database in Notion:

Recipe List - Notion

Looking for a vegetarian dinner? What about an egg-based breakfast? Maybe just a gluten-free snack… It’s as simple as combining the tags and filtering for desired results.

Recipes - Notion filtered

So much easier than sifting through a huge pile of text-note clippings.

Personal Workspace and Linked Databases

One of the other most useful features of the database storage model over using text notes, files, or simple tables is that you can create ‘linked database views’ in different places. In other words, you can have one central database for a particular purpose, and then filter that database to display the relevant data for the appropriate section you are working in. That sounds a bit convoluted, but here’s a practical example. If I want to compile a Reading List of different blog posts, books, journal articles etc that I want to read… rather than having different databases for each area of my life (work, personal, music, language learning, etc), I can have the main database like so:

Notion Reading List

and then under a specific page, I can have a dedicated ‘view’ of that same database, presenting only the relevant entries. For example, here is how I have the Reading List set up to display on my dedicated Japanese learning page:

Japanese Reading List

Note that it isn’t just displaying a particular sub-set of the data (filtered by those articles tagged ‘Japanese’), but I can also choose how it appears on the page. There’s a bunch of different options including simplified lists, full tables, galleries, etc.

As you can see, rather than creating a typical file structure where you collect pages and files or notes within a hierarchy of folders, Notion encourages you to put together what are essentially ‘dashboards’ of data. This means that on the top level you can display the data from the various collections underneath it – not just act as a blank ‘storage box’. This is an incredibly useful feature, which means you can set up different workspaces for different projects, or for different areas of your life… even if just to separate out work and personal items.

Web Clipper

Evernote’s Web Clipper tool is known for its ability to grab almost anything from the web and squirrel it away for reference – whether it’s screenshots, selections of text, full web-pages, or whatever else – so Notion has a tough act to follow in that regard. In practice, it isn’t as configurable on the surface, which is a bit of a shame. However, it is deceivingly powerful. Here is how it looks when saving an article from a site:

Notion Web Clipper

As you can see, there aren’t all that many options. On the bottom right you can click and search for the page you wish to import the clipping to – but not much else. What isn’t obvious though, is that Notion will grab various fields, and import them into the appropriate tables of a pre-existing database. That means, that it will save the URL into the ‘URL’ column of your Reading List table. This is really handy, as it means you have to do less leg-work when it comes to getting different kinds of info into your custom databases. Unfortunately, the extent to which you can modify this is fairly limited… (as in, to tell the clipper to save the URL to a different table field, etc) but hopefully that will come in a future update.

UI and Page Formatting

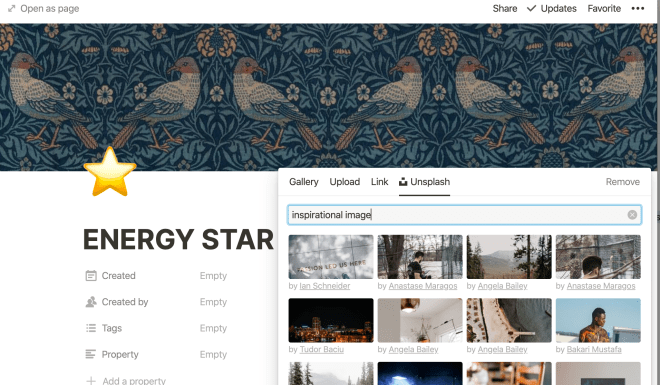
The UI of the Notion block-style editor is particularly nice. Emojis are littered everywhere, acting as icons or nice little visual indicators, and you can customise pages with images pulled from around the web. There’s even an Unsplash integration, which is a pretty great way to directly get access to high quality images for free.

Unsplash Integration - Notion

There is also a wealth of different ways to format the information on your pages and organise them as you see fit, including collapsible sections, different headings, etc.

rich text editor Notion

Anyway, you’ve all seen rich text editors before… but it’s worth saying that the options here are far more fully-featured than I would have expected.

File Handling and Embeds

It should go without saying, but embedding content from other parts of the web like YouTube is really easy. However, at first I thought that file handling in terms of uploads might not be so great, based on various reviews talking about how great Evernote was at handling all kinds of different file types. In practice though, this wasn’t really the case. While you have to purposefully create an ’embed’ block first and then upload your file to Notion for it to display inline (if you just drag and drop, it will create a download link instead) – it is still perfectly functional, handling PDFs, MP3s, etc.

File handling Notion

The one caveat here is that while Notion is free for personal use, uploading files larger than 5mb requires a paid account – which starts at 4USD per month for an annual subscription (or 5USD on a monthly basis).

How I use Notion

Years ago I helped create a Wiki style ‘portal’ for a company that I worked for. The idea being to serve as a central Intranet dashboard full of links, news, and other resources that folks might need. The software we used wasn’t exactly up to scratch, but it got the job done. If Notion had been available back then, it would have fitted the bill perfectly – and that’s one of its major strengths.

Instead of having all different kinds of data stored in different services that I inevitably forget about (Pocket, Evernote, Google Spreadsheets, etc), I now have a single personal ‘portal’ which displays a whole bunch of stuff that I need and use on a daily basis – or simply want to be reminded of. Links to commonly used sites, goals for the year, habits I want to track, articles I want to read, etc. There’s so much information collected and organised in the one place that it’s hard to show just what I mean, but here’s something of an insight…

Notion homepage

Having everything I need organised and presented in this way, where I can see the status of a bunch of different ongoing projects at a glance, and dig in deeper into the sub-pages for more information as required has been really liberating. Instead of just chucking every little thing I find on the web which might be useful one day into vaguely defined categories in Evernote (which never really worked very well), I now have things much more neatly defined, and feel so much more organised. It has lifted some kind of low-level mental pressure around accumulating so much data that I would never be able to find again because of its haphazard nature.

Conclusion

I really didn’t expect to take to Notion in the way that I have. While it did initially take some adjustment to understand its core kind of usage philosophy, and a bit of time to set up and input my data in a way that made sense for me, it has replaced and improved on so many different areas of my daily workflows that I can’t imagine going back to Evernote.

Ultimately, the data that I save is now far more organised, far easier to access, and much more useful than it ever has been before as a result. I would definitely recommend it to anybody interested in keeping track of their digital knowledge base.

There is so much more to the app than I can squeeze into a single post, including the ability to manipulate or query the databases via scripts, etc… and so I’ll post a few follow-ups with specific use cases for more details.