Category: Technology

  • Pico Tracker Advance Librarian

    Pico Tracker Advance Librarian

    I am a big fan of hardware trackers, and a few months ago, I got a Pico Tracker Advance from Xiphonics.

    I won’t go into all of the ins-and-outs of what a tracker is, but for those that don’t know – it’s a way of composing music popularised by software like OctaMED on the Amiga, and LSDJ on the Game Boy.

    The whole point of the Pico Tracker Advance is that you can write tunes on the go, with its rather nice portable handheld form. However, a computer inevitably ends up involved in the process at various stages – to transfer samples, or export your songs.

    As something of a well-heeled tracker enthusiast, I know from experience that there are a bunch of things that are just easier on the computer – and so I built out a collection of tools specifically designed to augment the whole process.

    You can find PT-Librarian over on my site here.

    There are a pile of features, but some of the key ones are:

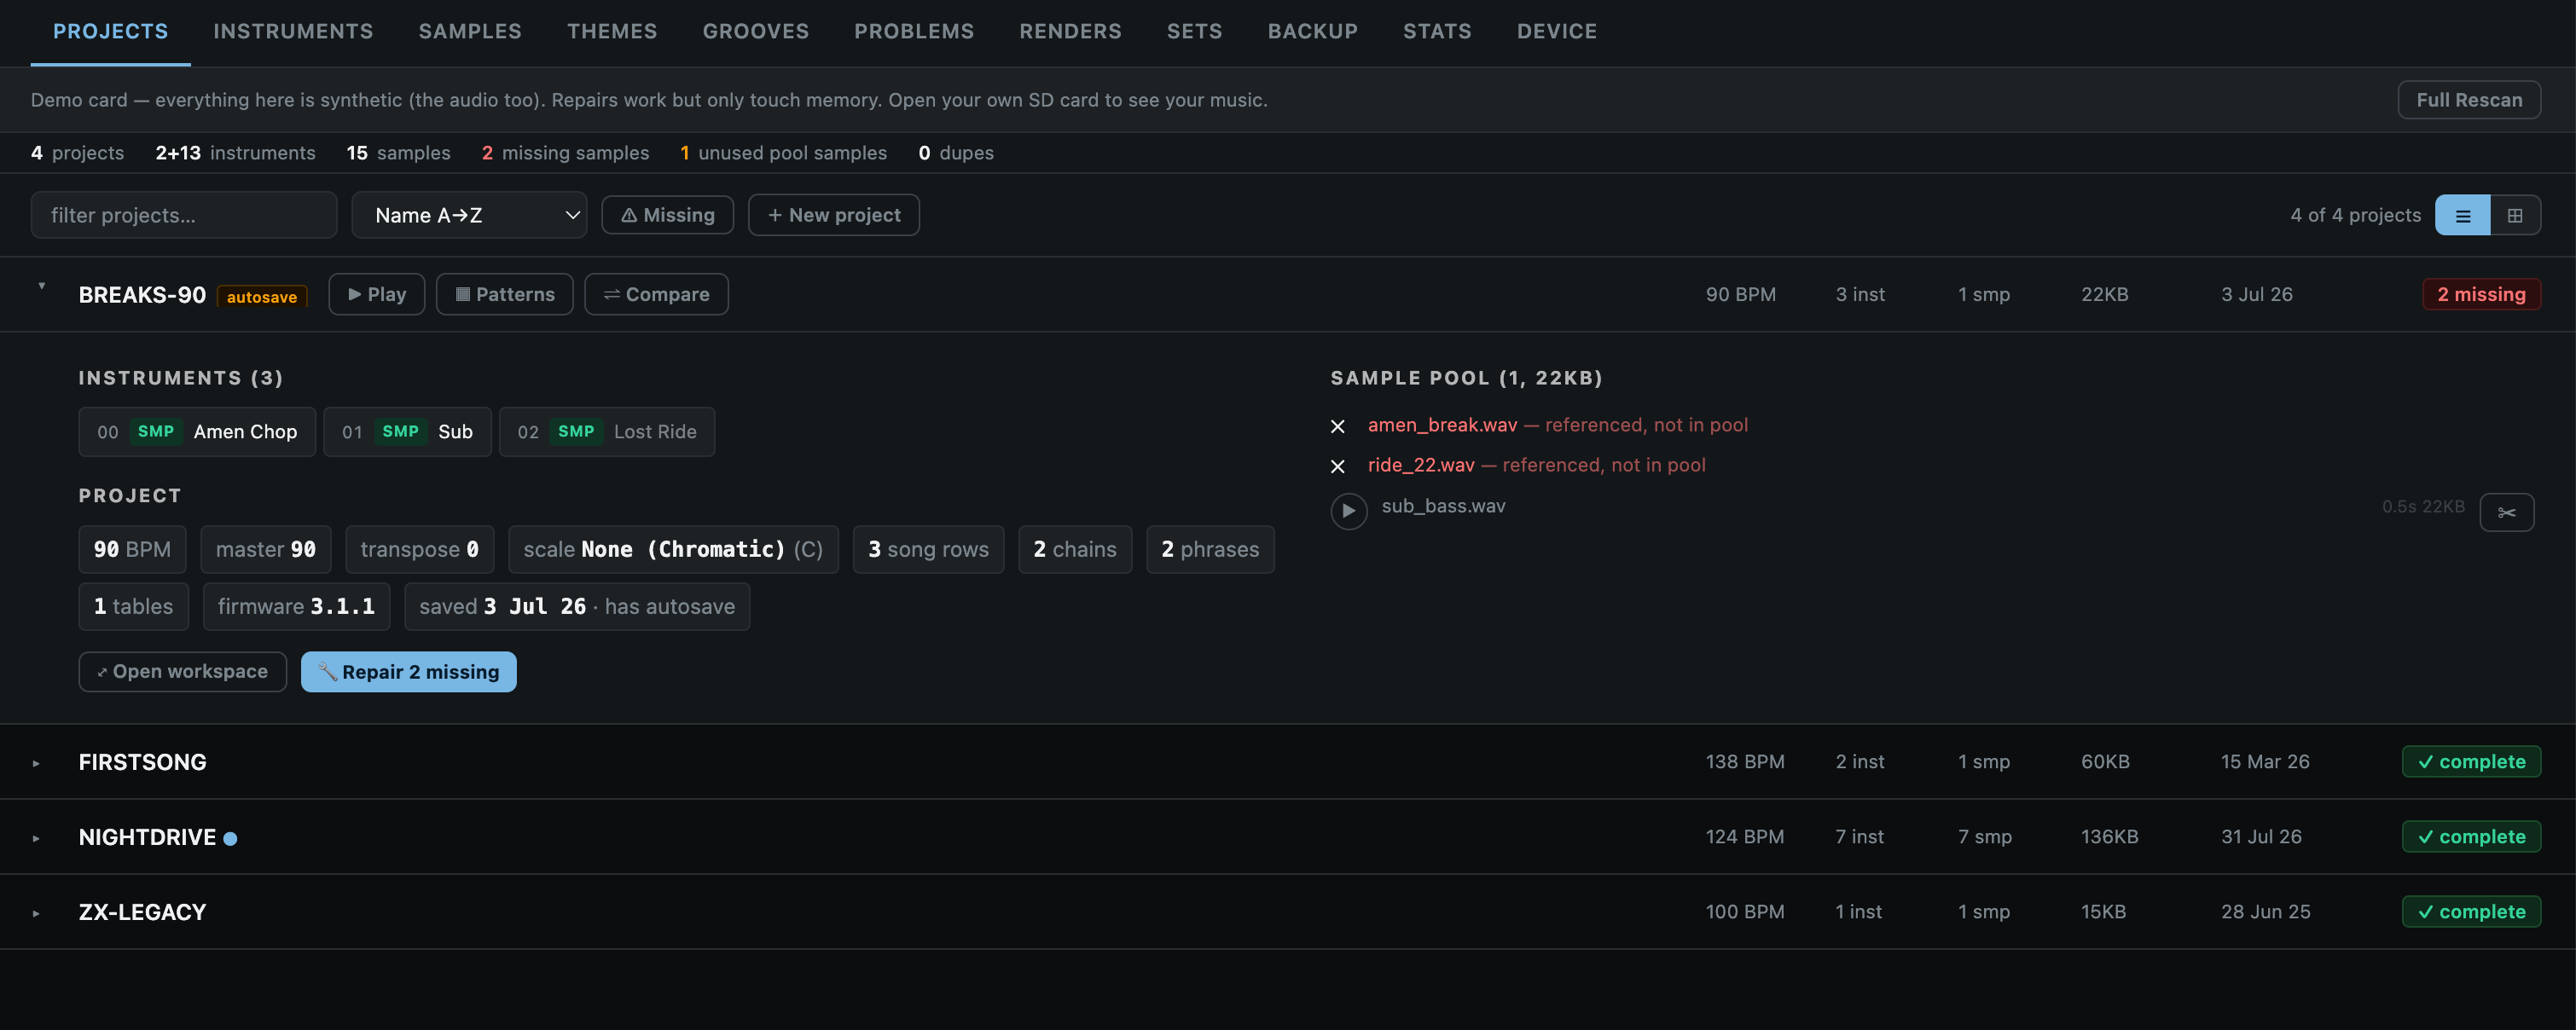
    Project manager – view, preview, and edit projects – including exporting stems/mixdowns.

    Setlist builder – to create custom folders of songs in order, ready for playing live.

    Pattern editor – tweak patterns/edit songs from the browser.

    Sample manager – analyse, preview, delete, and identify broken links to samples.

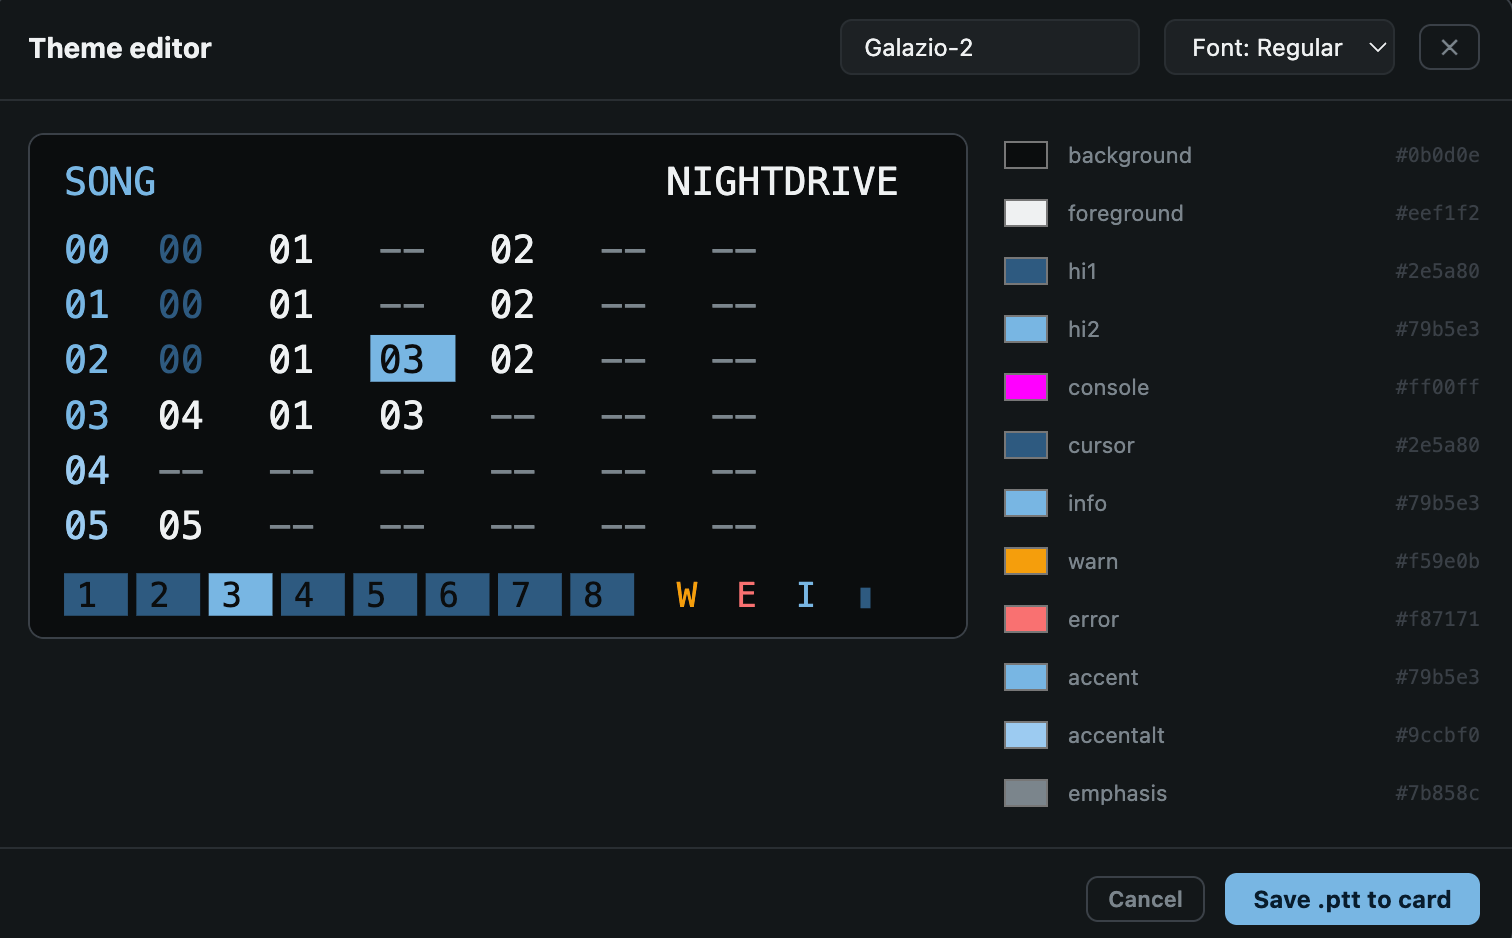
    Theme manager – Create, edit, preview, and apply themes.

    Audio Reactive Video Mirror – This is a big fun one for me. It lets you use the remote UI to mirror the display, apply effects and also have them react to incoming audio. Good for playing live/recording via OBS for music videos or whatever.

    Fair Warning: This is a collection of utilities I put together for my own personal whims, and development is still experimental. Feel free to try it out, but make sure to backup your projects and SD card to avoid any unintended data loss. I don’t take responsibility for any screw-ups!

  • OpenNura for macOS

    OpenNura for macOS

    The Background

    A long time ago I bought a set of Nuraphones – these unique, over-ear headphones that promised immersive sound and incredible bass.

    The results were good, and to this day I haven’t ever tried any other headphones like them. They weren’t without their flaws though: bulky, uncomfortable, and with proprietary cables – all factors which meant I haven’t really used them much over the last few years.

    Recently, I dug them out to have another go, and discovered a couple of things:

    1. A simple mod had been discovered that made the inner-ear tips a bit less fatiguing on the ol’ lugs.
    2. The manufacturer had been bought out, and the nuraphones discontinued in 2023.

    While it was great news that I could now enjoy the impressive sound of these things without wanting to rip my ears out from the pain, the fact they were no longer going to be supported by the manufacturer was a real issue, because certain key settings of the headphones can only be modified with the use of a mobile app. It was just a matter of time before that was no longer supported.

    Thankfully, after a bit of Googling, I found that the community had created a few different desktop applications to allow access to these settings.

    The projects that already existed

    The star of the show is opennura by James Young: an open-source Mac app that already spoke the nuraphone’s control protocol (Qualcomm GAIA) and had the encryption handshake figured out. There was just one catch. Every nuraphone has a unique encryption key baked into it, and without that key an app can connect to the headphones but not actually control them. The official mobile app fetched the key from Nura’s servers when you first set the headphones up, and there was no way to do that on a Mac.

    That piece of the puzzle had been solved by Nura-Windows, an impressively thorough bit of reverse engineering by Callum Carmicheal. His project worked out the entire ‘provisioning’ dance: sign in with your Nura account, and the app lets the headphones communicate with the Nura servers to get your key. Brilliant. Also: Windows only.

    So the situation was a Mac app that couldn’t get the key, and a Windows app that could. Huge thanks to both James and Callum, because without their work none of what follows would exist.

    The Application

    I got in touch with James to ask if he would be open to releasing his work under the GPL, and me forking it – to which he kindly agreed (the Nura Windows project was already released under an Apache 2 License).

    With a lot of help from Claude, I ported the key recovery flow from the Windows project over to macOS. Along the way I ran into a number of issues, including the discovery that the headphones wouldn’t play nicely for me over bluetooth LE – only classic Bluetooth.

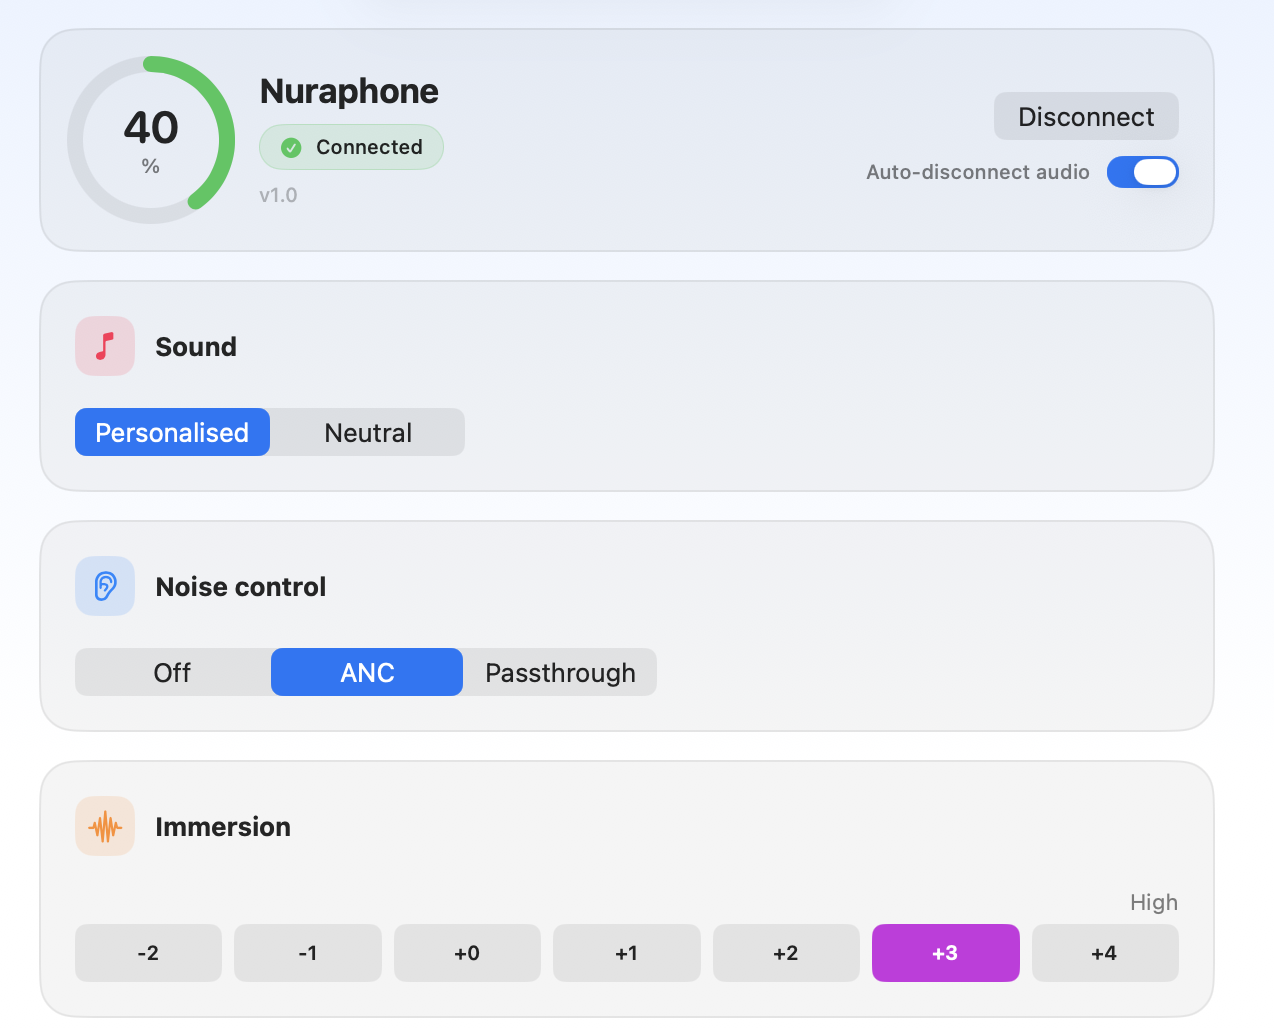
    Anyway, the result of my experimentation is an evolution of OpenNura for Mac: a native macOS app that can recover your headphone’s key with nothing but your Nura account and a Mac, and then gives you full control of the important settings. Noise cancelling and social mode, personalised sound, immersion, switching and renaming profiles, remapping the touch buttons, and even a wee visualisation of your hearing profiles so you can compare them.

    The initial screen
    Main screen controls

    As a bonus, there’s also a menu bar app and global, user-definable hotkeys too, so you can quickly switch things mid-song.

    The menu bar

    Final Words

    There’s a signed and notarised build of the Mac app on the releases page if you just want to download it, and I am chuffed to see that the PR has already been merged into the official project.

    It might be worth doing this even if you don’t plan to use the app day-to-day, as it means you can retrieve your key and ensure that your headphones remain controllable in the years to come, even if Nura’s servers eventually go offline. On the key retrieval specifically: it signs in with your own Nura account, talks only to Nura’s official servers, and stores the key locally in your Mac’s Keychain. Nothing goes anywhere else, and it’s all open source so you can check for yourself (or build from source if you’d rather not run a binary).

    I am really pleased that nearly a decade after I first got these headphones, with manufacturer support disappearing, I can now use these more seamlessly with my laptop, and hopefully ensure that’s the case even when the official mobile app stops working. All thanks to the community. Open source at its best.

    Exciting Disclaimer Notes

    A word of warning if you try this yourself: these are reverse-engineered protocols talking to hardware strapped to your ears. At one point during development the headphones let out a genuinely deafening tone, which prompted a whole layer of safety guards in the app. It’s all in the README, but the short version is: first time you connect, keep the tips out of your ears. Use at your own risk.

    Nura and Nuraphone are trademarks of their respective owners. This non-commercial project is not affiliated with or endorsed by them in any way; the names are used only to identify compatible hardware.

  • Holding Pattern: Combating Time Blindness with a custom daily planner

    The curse of meetings

    I’ve always hated meetings.

    Whether in-person or remote – they always felt like an interruption; A distraction from what I was supposed to be doing. A disruption to productivity. One single 60 minute call could effectively de-rail an entire day.

    Over time, I’ve adopted various strategies to limit the number of calls on my calendar, and deliberately batch them to mitigate the heavy cost of context-switching.

    Such an aversion to calls can often be seen as laziness, but the truth is that not everybody operates in the same way, and I’ve come to realise that rather than a deficiency, the manner in which my brain perceives time, concentration, and obligations is just a bit different from others. (While not exactly the same, there’s a good article that touches on the idea of the Maker v. Manager schedule).

    To some end this has been a blessing. For one thing, I have managed to avoid the trap that many mangers or senior people seem to fall into – with constant, back-to-back meetings attended out of a self-imposed sense of expectation, sucking up all of my available time.

    However. Meetings are also unavoidable. And dare I say it, also sometimes beneficial. Especially if you work remotely – as it provides an opportunity to communicate ‘face to face’, rather than asynchronously over text – with all of the associated positives. As a result, I have continued to search and experiment with different ways to hopefully lessen the cognitive burden.

    Time Blindness

    Something I discovered was that my natural inclination is to fixate on any scheduled calls as the ‘big thing’ for that day, which in my mind then squeezes out the ability to do anything meaningful on either side. A kind of time blindness.

    I tried different ways to combat this. For example: Tagging every item on my to do list with an estimated time of completion. The idea being that this would force my brain to realise that there was time to do other tasks, even if it felt there wasn’t. However, nothing really stuck.

    The closest I came was with a physical daily planner. By laying out the ‘big things’ I had to do on paper, I could clearly visualise the amount of time left – which was always much more than expected.

    As much as I love the tangibility of that… it is also inherently inflexible. Schedules change. Things move around. And you can’t easily change what has been commited to paper. So… I created my own digital version.

    The Daily Planner

    Holding Pattern is a bespoke daily planner that I created with Claude Co-Work.

    It pulls in data from my personal and work calendars via Google oAuth, and allows me to augment these bigger ‘events’ with smaller additional daily ‘tasks’ that aren’t important enough to warrant their own calendar entries.

    Similar to my old-school paper planner, the tool allows me to visualise each day in a way that clearly demonstrates how much time there actually is – rather than fixating on the one ‘big’ meeting or call.

    Fake data!

    Another feature I built-in was the ability to tag, and then check-off or track different events. This produces a list of completed tasks, demonstrating at a glance how much (or little) I have done over any given period, and providing a source for producing bi-weekly personal updates.

    I need to do more, clearly.

    There are definitely tools out there that do various bits of what this tool does. Calendars, To Do Lists, Planners – but none of them combined all of the features I wanted in a single place – without additional fluff or complexity.

    Implementation

    The planner took a day or so to build, and is hosted on GitHub Pages, served via a custom subdomain to make it easier to remember.

    It relies fairly heavily on Google oAuth – both to connect to my calendars, but also to synchronise the additional ‘task’ and settings data to Google Drive. That, coupled with the bespoke personal nature means that it is unlikely to be much use off the shelf to anybody else. But… perhaps it will help to spark some ideas for folks out there who have similar struggles with scheduling. The project source is available on GitHub, should you want to poke about.

    While there are certainly many major questions about the advent of AI technology, I can’t help but be impressed and excited about the potential it provides for individualised solutions like this.

  • Planting a Digital Garden

    One of the cool things about working at a place like Automattic is that you are part of this global network of inspiring people that often think deeply, creatively, and publicly about expression. Unfortunately, it is incredibly easy to become blind to the verdure, as a result of the daily obligations that our busy roles require.

    Over the past couple of days I decided that the thicket of ‘low priority’ e-mail notifications I had allowed to build up was becoming unreasonable – even by my standards – and that I urgently needed to wrest some kind of control back. As I hacked through the undergrwoth, I came across some posts on my colleague Cheri’s blog talking about the idea of a ‘digital garden’ – which immediately sparked some kind of mental wildfire.

    What is a digital garden?

    So what the heck is a digital garden anyway? I am well aware that it may sound dangerously twee, but bear with me, as I think there’s something to it. There isn’t a specific definition that I am aware of, but if I had to boil my understanding of it down to a simple summary, it would be:

    An open, personal collection of perpetually evolving notes and other media, which eschews attributes commonly associated with blogs or other platforms such as presentation via chronological order based on publication date.

    That’s quite a mouthful, but effectively what this describes is an approach to a website that has an assortment of different snippets on various topics, loosely organised. Kind of like a personal Wikipedia, or a public notebook.

    The concept isn’t really new, even if the nomenclature is – and it actually strongly reminds me of the way that personal websites used to be, before the web became more structured, and often siloed through the use of social media timelines. An important element of such a thing is the reliance on contextual hyperlinks, to tie pages together in a much more organic and idiosyncratic way, as opposed to rigid categorical linearity.

    Reimagining blogs

    One of the things that we know people struggle with when it comes to blogging is how to keep their site active. Commitments to a regular posting schedule quickly fall by the wayside in the face of internalised pressure to have something ‘worthwhile’ to say, particularly when the output has to be the finished article. Even with the best of intentions, disillusionment can often follow, with the process becoming more of a chore than a liberation.

    Despite my love for – and involvement with – blogs, I too feel this sense of inadequacy keenly. That should be self-evident purely based on the date of the last post I made here, which was over 9 months ago. However, I also currently have 71 drafts in progress over on my main photo blog allmyfriendsarejpegs. While I am constantly writing and updating, the nature of these and my own perfectionism means that I am often stuck in a constant state of false progress, working on articles that will potentially never see the light of day.

    Preservation, not Presentation

    I find fascinated by the possible reconception of blogging that the idea of a digital garden brings. Removing the finality of publication, as well as the perceived need for time based updates means that you can focus purely on the act of writing and collation – as opposed to chasing what effectively amounts to a kind of news update or dated diary.

    Over the past couple of years I have struggled with a declining interest in photography – something that used to be central to my identity. As part of an ongoing period of reflection on that, I’ve come to realise that part of the reason may come down to a gradual change in why I take pictures. I think that I have probably become so concerned with getting the right shots for an eventual, theoretical blog post, that I no longer enjoy or engage with the process itself. In other words: my preoccupation with the final presentation of the work has supplanted the reason for participating in its creation in the first place.

    As I’ve begun to explore this revelation, I’ve consciously shifted my approach away from a concern with the eventual presentation of content, to one of preservation, where I take pictures or shoot video to capture moments purely for the sake of doing so itself – not thinking about what I will necessarily do with them later. That simple adjustment has completely transformed my way of thinking, and reinvigorated a lot of the passion that I once had in these kinds of expressive actions.

    The notion of planting and growing a digital garden which is more concerned with the ongoing as opposed to the culmination strikes a chord with me partly because of this understanding, and is one that I find incredibly exciting.

    The Plan

    Going forward, I am going to experiment with the idea on this site. As far as I’m aware, there aren’t any specific themes or established methodologies for doing so with WordPress, but it seems like fertile ground on which to explore.

    My plan is to:

    1. Move the date-specific blog portion of this site to its own dedicated area.
    2. Create pages for specific ideas, notes, and musings that come to mind, as and when they do.
    3. Replace the home page with a splash which will help people navigate this brave new world.

    There are some challenges of course, including the fact that page updates won’t necessarily produce any kind of notification to readers, and it will be difficult for folks to track what is new. However, I am keen to embrace the chaos, and kind of like the idea of things sprouting up naturally in what may end up as a tangled, inter-connected suffusion. For that reason, I am not going to implement any specific automated systems of categorisation and sorting, as that would spoil some of the magic.

    Irrespective of how this turns out, I am looking forward to breathing new life into this site, and perhaps feeling a bit less terrible about paying the annual domain renewal fees for something I rarely update.

  • Restoring Classic iPods, Part II. (plus scrobbling to Last.FM with LastPod!)

    Last year I finally pulled together a post for a project that I had begun years ago, but never written up: Restoring a 3rd Generation iPod Classic. In that, I outlined my various mis-adventures upgrading the battery, hard drive, replacing the clickwheel electronics, the case, and… well. Everything.

    ipod 3rd gen restore

    Seeing this, a friend shared an article with me about someone who had taken things a step further, and basically rebuilt his entire 4th Gen iPod to stream from Spotify. While looking into how they had managed it, I fell down the rabbit hole of what has apparently become a fairly active iPod modification/restoration community. There’s even someone called DankPods who has racked up 600k subscribers in only a year. Damn. Maybe I should have made more of an effort to document things back in 2016 when I started working on these old iPods. I could have found YouTube fame.

    Nah, probably not.

    Anyway, what I did find was that there were now a whole host of resources for modifying and restoring these old iPods which weren’t necessarily available, or as clear as they were when I first started looking into them – and it’s piqued my intrigue for how I could expand on, or revisit this project.

    Scrobbling to Last.FM

    It might sound ridiculous, but one of the things I really missed when using my beloved 3rd Gen iPod was the ability to log all of the music I listen to using Last.FM, as I use that data to help discover new artists, and a bunch of other things. There were some tools available, but none of them really worked… and come on, I even scrobble my LPs with Vinyl Scrobbler, so it seemed ridiculous that I couldn’t do that with the iPod.

    As luck would have it, I came across a little Java application called LastPod which solves this problem. I’m not sure how I never found this before, but I thought I would share as it’s the only solution that I’ve found which does the job. Essentially, you listen to tracks on your iPod (making sure the date and time are set correctly), plug it in to your computer, open up LastPod, make sure it knows where your iPod database is (a quick config that persists after the first time), and then… you can scrobble your tracks! There are a couple of caveats, including the limitation of only being able to scrobble each song once (so it can’t track multiple listens), and that you need to synch your iPod with iTunes or whatever after you Scrobble to reset the counters… but! It works, and I am unreasonably happy about this.

    Don’t judge.
    Last.FM.

    Flash Modification

    Back when I was looking at options for increased storage in the iPod, there was talk of being able to use Compact Flash cards to store the songs, instead of the bulky hard drives they were designed to work with. However, this was reportedly flakey, and so it’s not a route I went down in the end. However… now, there are a bunch of different options for using the much cheaper and higher capacity SD/MicroSD cards in old iPods. As well as kind of cheap standard CF to IDE adaptors, there’s a brand called iFlash which makes specific adaptors to allow you to use up to 4 SD cards in one iPod. Wild!

    USB Charging

    As I mentioned in my last post, despite being arguably the most beautiful of all the iPods, the big issue with the 3rd Gen Classic is that it only charges over Firewire. This means that you need a specific cable and plug to charge the bloody thing, or a dock. These are bulky, getting harder to come buy, and increasingly pricey. If you’re travelling, that means no USB power bank to juice up the thing easily.

    It appears that some enterprising folks have found a way to address this problem though, using a MICRO USB 1A Battery Charging Module TP4056. This is essentially just a small PCB which lets you charge up batteries over USB. In theory, if you have already modified your iPod to use a flash drive, then there is space inside the case to install the board, and you can then avoid the firewire problem completely.

    This is probably the most tricky of all the modifications though. I’m not 100% on the best way to wire this together, and lithium ion batteries are a bit of a fire risk if you cock things up. You also need to find a place to put the USB port (or pull the power from the usual 40 pin connector), and that means making a new hole in the case. Definitely not for the faint hearted… or if you are crap at DIY like myself.

    Rockbox

    After reading my last post, someone helpfully left a comment pointing me towards the existence of Rockbox – a free, open source bit of software that replaces the OEM music management functions on a whole variety of different portable players, including the iPod.

    This allows you to bypass iTunes completely, and just load music up in disk mode, which could be pretttty useful. In theory it could also make Last.FM scrobbling a bit easier, though now I’ve found LastPod I’m less concerned about that.

    Customised Shells

    Such is the growing popularity of restoring these classic devices that you can now pick up drop-in replacement shells to customise the look, with some really cool colour combinations available. Here’s a look at some options from Aliexpress.

    This reminds me of what happened with Game Boy modifications. Early on it was pretty difficult and hacky to do… and then people started getting better at it, and putting out better tutorials and kits. Now, there are full shops dedicated to selling brand new parts with an almost mind boggling variety of customisation options.

    The caveat here is that most of the shells are for the 4th Gen iPod and up. The plucky 3rd gen is still a bit of a weirdo, and so there aren’t really any drop-in options if you want what I maintain is the best iPod design ever.

    Built in OSX Support

    One thing that surprised me when I plugged my 3rd Gen iPod into my newest Mac (running Catalina) was that it appeared to be picked up and detected better than in previous OSX versions. It turns out that when Apple started phasing out iTunes, they actually integrated the iPod directly into MacOS, so you can access and synch it from Finder itself. The feature set is limited, but it’s pretty cool to see an ‘obsolete’ piece of hardware still being supported by a major developer. Respect where it’s due!

    My Restoration Plans

    So… now that the modding community has caught up, and there’s all these new options available, I feel like I’m going to have to at least attempt to experiment with a few of them. I’m a bit torn at the moment between further modifying my current 3rd gen, and leaving it be… getting a separate 4th or 5th gen iPod to work on. So here’s my thoughts/plans:

    1. FlashMod. If I restore any other iPods, I’ll definitely be using a FlashMod. There are cheap CF to IDE alternatives, but they can be a bit buggy, so I’ll need to decide whether to use them or just go straight for the iFlash devices which are the creme de la creme. In particular, I like the ability to use multiple SD cards internally.
    2. USB charging mod for 3rd gen. This out of all of the modifications is the one I would love to be able to implement, as it would free up my iPod from the shackles of Firewire. However, I don’t want to risk mucking up the case, and I suspect that I would never fully trust the safety of the Lithium battery with my modification. Probably not smart to take it on a plane and charge… so perhaps this will need to remain a pipe dream.
    3. USB charging alternative. I dug out a pile of dongles and various adaptors that I have (I knew keeping that box of random connectors was a good idea!!), and tried going from the Apple split Firewire/USB Y-cable through a Firewire converter, to Thunderbolt, to USB… plugging into my Mac. Miraculously, the iPod appeared to be charging (!). However… it wouldn’t initialise on OSX. I wouldn’t want to leave it like that, as the disk kept clicking to try spin up, but it does suggest that I could plug directly into a USB port and just draw power with the right adaptor. Potentially it might also work better with a flash mod. I’ve ordered some different adaptors to test out, and I’m hoping I can find a solution…
    4. Rockbox. I am really curious about Rockbox, and if I have trouble updating the iPod again in future with iTunes I’ll seriously consider it. However, part of the reason I like the 3rd gen iPod is for its UI, and I think that replacing the OS would kind of ruin that experience. There are apparently themes available to get you close to the original, but I’m not entirely sure how legit that would be. If I got a different gen iPod I would definitely try it out though.
    5. Customisation. This is where I could get in trouble, as I’d want ALL the colour combinations. If I’m not careful I could end up with 15 iPods.

    Unsurprisingly the Classic iPods have been going up in price gradually as folks realise what you can do with them, so finding a bargain is getting tougher – again similar to Game Boys. Ultimately I suspect that if I do modify any other iPods I’ll look at something like the 5th Gen, as they can charge over USB. Currently though, the combined cost of the various parts would be around £120 all in, and I’m not quite prepared to spend that on another iPod project just yet. Watch this space.

  • Book Review: Atomic Habits

    As a fellow productivity geek, my pal Pazy recommended I check out ‘Atomic Habits’ by James Clear. You can read his write-up on his blog here. The book takes a look at different ways you can improve different elements of your life by shifting your perspective from solely looking at outcomes or goals, to change at a smaller scale. To do that, Clear provides a variety of practical tips that help you to adopt and cement new habits which over time lead to larger benefits.

    Looking at tracking habits is something that I only really started thinking about in the past few months, after I began to use Notion, and started thinking about my repeating tasks as habits rather than to do list items. This turned out to be transformative, as there is something far more satisfying about maintaining a streak than there is checking off a task, only to immediately re-add it to your To Do list for the next day.

    There were lots of compelling ideas in the book that merit further exploration, and I suspect I will have to go back over them a few times to make the most of it. A few in particular stuck out for me though:

    Habit Stacking

    One of the ideas that I liked in particular was the concept of ‘habit stacking’, which involves taking something that you do on a recurring basis, and connecting it to another habit (or series of habits) that you want to adopt. In other words, if you are struggling to remember to do a particular task regularly, tie that in with a specific recurring task that you know you’ll do whatever happens. For example: If you have a cup of coffee every day, but want to get better at listening to a podcast, conjoin the two. If you find that your desk is constantly getting cluttered, resolve to tidy up one piece every time you get up to go to the bathroom, or grab a drink.

    Similarly, you can chain or cascade different habits together, so if you are chucking some bit of rubbish from your desk every time you get up, and are already in the kitchen, tie that action to another habit – like washing one plate or cup. This is something that we already do in many ways, such as brushing our teeth after we take a shower in the morning, so it’s a matter of adapting these chains to include the habits that we want to improve upon.

    Gradual Improvement

    The whole idea of habit stacking is rooted in the idea that by adopting habits which make changes – irrespective of how small they might be – that incrementally they lead to much larger change over time. Even just improving something by 1% each day will eventually lead to significant development. In some ways, the argument is that the act of repetition alone is more important than the quality of the action – at least in the start. Once a habit is formed, you can then increase or adapt the quality or intensity of the action. In other words – if you are trying to learn a new language, simply sticking with it and doing five minutes of practice a day over a long period of time will ultimately provide a greater basis than erratic periods of concentrated effort. This will sound familiar to anybody who has seen DuoLingo’s sales pitch.

    This idea is something I’ve come across before – particularly in relation to learning guitar – where authors recommend starting out by just strumming the guitar for 30 seconds a day at first, then building that time up once the habit is formed.

    As someone who goes through periods of fixation on particular past-times, such as becoming very intensely interested and inspired to make music, write, or take photographs, I find the idea of using habits to balance out those waves somewhat; and as a means to maintain some level of interest even through periods of relative lack of inspiration quite compelling. However, I do also think that on its own, dedicating very small amounts of time to a particular task will not – in the long term – lead to the kind of growth that I am interested in. For example, you could do 5 minutes of Japanese on DuoLingo for years and probably pick up a decent amount, but if you are serious about fluency, at some point you need to make sure you develop your habits. I need to reflect a bit more on how to do that in a sustainable way with multiple competing interests which could ostensibly take up a significant amount of time.

    Improvement isn’t linear

    Another thing that stuck out for me from the book was that improvement follows an exponential curve, rather than a linear one. By that, I mean that often it can seem like you are getting absolutely nowhere, until you reach a certain point – and then lots of things click into place at once. This is something that I have definitely experienced – both with playing guitar, and with learning another language, and I am sure lots of other people will have as well. The book’s contention is that we expect improvement to be gradual, obvious, consistent, and visible, but that that isn’t how it happens in reality. If we recognise and accept that, then it helps maintain momentum.

    Summary

    Because every blog needs a conclusion. If you want to take up something new, get better at tidying up, or just gain a new perspective on how we manage daily tasks, I’d say this is worth a read. If nothing else, gradual small bits of work feel like much less of an obstacle than letting things build up into one single large task – and the strategies here help with that.

    You can buy a copy of the book here.

    NB: If you click through on Amazon via the link above and purchase something, I may get a (miniscule) referral fee. Thanks in advance!

  • Keeb build log: BM40hsrgb

    Keeb build log: BM40hsrgb

    I am a big fan of colourful lights… whether they are neon, fairy, or ambi. I am also a big fan of custom mechanical keyboards. Unfortunately, I’ve never been able to bring those two interests together, as the boards that I’ve built were too fiddly or didn’t quite bring enough LEDs to the party. However, last month I came across an amazing keyboard build from /u/_GEIST_ on Reddit, which inspired me to have another go.

    Digging into the specs of that build, I discovered that the relatively cheap BM40 PCB not only supported RGB underglow, but had the holy grail of individual LEDs per key… and that in the latest versions of the QMK keyboard software, you could get some really cool animations that would be triggered on each keypress (or release).

    An unassuming beastie.

    The parts

    One of the big challenges of building custom mechanical keyboards is finding suitable parts for the project you want to build. Often, getting affordable cases can be tricky, and when you do find them, they are often of poor quality. There’s also the additional challenge of putting together the PCB with the required components. I have reasonable soldering skills, but having to connect up all of the resistors, diodes, and switches is an exercise in patience which I do not have… especially when you start to add in all of the LEDs. There’s also always the danger that you mess something up, and ruin the PCB, which is quite possible if you aren’t overly familiar with building keyboards. This is something I had managed to do fairly recently, and so I didn’t fancy experiencing another failure so soon after.

    PCB + Case

    Enter the BM40 board. Not only did this have all of the LEDs, and came with the components pre-soldered, it was also hot-swappable, which means that you can just click the switches into place, without having to solder them in. Brilliant. I picked up this, along with a case which had a diffused bottom panel to let the RGB lights shine through from KPRepublic on Aliexpress. The PCB connects via USB C, which is a nice touch.

    Switches + Caps

    When it comes to switches, I prefer really clicky keys. The clickier the better. However, that doesn’t always win you many popularity contests, and since my main keyboard has Cherry Blues in it, I decided to go for a more tacticle switch. I had read good things about the Holy Panda tactile switches, and found the Everglide Oreos, which claimed to be similar. If you aren’t familiar with keyboard nomenclature, this means that they wouldn’t be obviously ‘clicky’ to press, but would have some kind of a bump to them on the way down (as opposed to being ‘linear’, and therefore smooth). The other reason I went with these is because they had a smokey black casing, which would let the LEDs shine through.

    For the keycaps, I went with my trusty flat DSA profile (rather than other profiles which are curved, or which have a shape change depending on the row and position of the key). I also selected the same kind of smokey black translucent colour to match the switches, and let the LEDs do their thing. I often use blank DSA caps as they are cheaper, and it means I can move them around my boards without having to worry about what is printed on them.

    Annoyingly, I didn’t realise that the board was not made up of individual 1u keys like the Planck or Preonic… in the sense that it has a 2u space bar key. This meant that my 1u DSA caps wouldn’t fit. I found a temporary solid white 2u cap that I’ve put in place for now, but it’s not the correct profile, so I’ll need to revisit that. Finding a 2u translucent keycap in the DSA profile is proving easier said than done unfortunately.

    Links + Cost

    1. BM40 PCB (Kit 1 with 2u stabilizers for the spacebar) – $37.52.
    2. Anodized aluminium JJ40 case (black version 2.0) – $70.90.
    3. Everglide Oreo tactile switches x70 – $45.60.
    4. Translucent black DSA keycaps x60 – £12.84.

    The build

    Putting the kit together was pretty easy. All you have to do is unscrew the bottom plate, hold the PCB in place and then connect the switches through the holes in the top of the case. However, there were a couple of stumbling blocks:

    1. There was no screws included to attach the PCB to the case, so the keys hold it in place. This makes getting it into position and not damaging the first few keys you attach a bit tricky.
    2. You need to install the keyboard spacer onto the PCB before you start attaching the keys. This means assembling it, which isn’t all that clear if you haven’t put one together before. After some frantic YouTubing I managed to figure it out, and had to take all the switches off again.

    Flashing the software

    The BM40 comes with its own software, but I immediately ditched it in favour of the de-facto standard QMK. There is no hardware reset button on the PCB to allow you to put it into DFU mode to flash the firmware, but there are two exposed points marked ‘RES’ which you can bridge with tweezers. This isn’t especially accessible given that the case is sealed up afterwards, so I made sure to include a soft RESET key on one of my custom layers.

    I did run into a bit of an issue initially, where I couldn’t get some of the QMK functions to work, such as the all-important custom LED animations. With help from the aforementioned _GEIST_, who kindly sent me his config files, I realised that I had flashed the software with the QMK version provided by the keyboard manufacturer, which was out of date. Re-flashing with the bm40hsrgb settings provided with the latest QMK build (which I then customised), got everything to work as it should.

    The Keymap

    I already have a keymap set up which I have refined over time for my Planck – which is similar to the BM40, in that it has about the same number of keys, so I stuck with an evolution of that, which makes it easier to switch between the boards. I touch type, and don’t really use the bumps on the keys to indicate finger position, so having blank keycaps isn’t really an issue for me unless there are special characters or macros which I need to remember.

    One of the cool things about having under-key LEDs is that theoretically I could code up a layout which maps certain colours to certain keys that I want to stand out. This isn’t something I’ve bothered looking into yet as I don’t feel like I need it, but it does make me think that I could build one of these boards as a dedicated MIDI controller, and change the keys depending on the notes of the scale. That’s probably a project for another day… but something I’m considering. Watch this space.

    Anyway, here is how my keys are laid out at the time of writing. There are four layers. The first layer is the base layer. The other layers are accessed via a combination of keypresses, just like you would use the shift key to access capital letters on a ‘regular’ keyboard.

    As well as the usual keys and media shortcuts, I have a bunch of custom shortcuts set up. For example, Alfred’s search has its own dedicated key on the base layer since I use it so often, as do my clipboard and bookmark managers. I also have keys specifically for copying, pasting, cutting; keys to copy the active URL in Chrome, and to strip down a long URL to its root (managed via Keyboard Maestro); and keys to perform tasks which become a bit trickier when you have a smaller board… like taking a screenshot.

    I’ve uploaded my keymap to GitHub for those of you who want to see the actual code.

    https://github.com/clickysteve/qmk_keyboard_layouts/blob/master/bm40hsrgb/keymap.c

    I’ve managed to configure things to change the colour of the keys temporarily when I activate layer 1 or 2, which is pretty useful. I can’t quite get it to work for the ‘adjust’ layer though, so if anybody has any tips on how to imrove the code, please let me know. I have a couple of ideas, but my brain is begining to melt looking at it, so I’ve given up for now.

    RGB Animations

    QMK’s built in RGB animations are awesome. Below I’ve uploaded a video running through some of the effects:

    Note that I deliberately didn’t record sound, as there’s far too many people who will over-analyse the sound of the switches, and that’s one can of worms I didn’t want to open.

    The Judgement

    This is my fifth mechanical keyboard, and the third one that I’ve built (successfully) myself. It does feel a bit like cheating to say I built it, since it is hot-swappable and so couldn’t get much easier. However, it’s also probably my favourite. The case has a wonderful heft to it that the aluminium frame I have for my Planck doesn’t, and I love the LEDs. I had considered getting different coloured translucent keycaps, but the all-black colour scheme is so unassuming that it adds to their effect, and they are so bright that the cap colour doesn’t really matter when they are on. I’m really pleased with it overall, and glad _GEIST_ didn’t mind that I shamefully copied their idea. It is a bit of a shame that the underglow isn’t quite as prominent due to the solid black sides of the case, so as a minor point it would be great if there was a slight cutaway round the edges, but that’s just being petty.

    The one thing that I’m not wild about is the choice of switches. While the Oreos are fine, they are very light, and not as tactile as I would like, at least not compared to the Outemu sky switches in my Planck. I end up bottoming out on them to such an extent that I may as well just have clicky keys in there, so I might end up changing them out at some point to find a better option… though they are growing on me. At the end of the day, having the option is the beauty of a hot-swappable board! Whatever happens, I definitely need to find a translucent 2u DSA keycap though, as the current one is driving me nuts. Even though the white looks pretty cool, it feels and sounds different to the rest of the board, and not in a good way.

    Perhaps one other thing I should mention is that the LEDs run fairly hot. I guess that might be expected given how bright they are, but it does make me wonder about what their lifespan will be. On top of that, I will probably be making use of the auto LED off feature built into QMK to avoid any… accidental fires. Better safe than sorry. Of course, I could just run them at something less than maximum brightness, but where would the fun be in that?!

  • How I replaced everything with Notion: Recurring Tasks and Wishlists

    Things: To Do items and other projects

    I’ve written before about how much I love Things, and that hasn’t changed. When it comes to organising and tracking daily tasks, Things is still my go-to. However, there were a couple of issues that I had begun to run into which were becoming counter-productive:

    1. Too many tasks, not enough organisation: Similar to what I had experienced with Evernote, while I was quick to dump all sorts of things I wanted to do into Things, it seemed like the ‘Someday’ and ‘Anytime’ pile were growing and growing into a huge, unmanageable mass. Piles of articles to read, videos to watch, and miscellaneous tasks. Even using tags, it was becoming a strange source of low-level anxiety, as I knew I would never get round to doing anything there.
    2. Recurring tasks never ‘completed’: Lots of the things I want to do are daily tasks, such as practicing Japanese, or making music. The problem with this was that most of my To Do list never really changed. I would tick off the checkbox, only to… immediately re-create it for the next day. It felt like a pointless exercise, and didn’t provide any of the satisfaction that I should feel upon completing a task.
    Things Organisation
    Eugh, what a mess.

    What I realised was… neither recurring tasks or lists of videos to watch, articles to read, or music to listen to are actually To Do list items at all, but something quite different.

    What I thought of as daily tasks are actually habits, rather than ‘to do’ items.

    This was an important one. Realising this was liberating, as I could approach the issue differently – with a Habit Tracker.

    My habit tracker within Notion.

    There are various different kinds of habit tracker templates available, and I customised one that I found online (I can’t remember where now, sorry!). Each week I create a new table, and adjust the habits I want to focus on as appropriate. This not only allows me to more easily track and report on my progress – but also frees up my To Do list in Things for one-off, immediate tasks that need to be completed on a specific day.

    Things to Read, Watch, and Listen to

    As I mentioned, my Things ‘Anytime’ lists were filled with different articles I wanted to read, or videos I wanted to watch at some point, and it simply wasn’t working. Instead, I created different databases in Notion to gather and organise this stuff.

    For example, here is my list of films to watch…

    an excerpt from my Reading List (don’t judge)…

    and my trimmed down YouTube list (filtering out the Japanese learning videos, as there’s so many of them).

    The beauty of this is that I can organise them in a much deeper way with Notion, assigning tags, related URLs, authors, etc – and then sort/display them on that basis. Rather than facing a huge list of items to get through like when they were chucked into Things, I can now dive in to the specific database and find exactly what I want when I have some spare time. I can also add notes and ratings when I’ve actually read or watched them, which are also reportable/sortable.

    Blog Post Ideas

    Ideas for blog posts were another thing that I used to store in Things, which didn’t really work out all that well. The reality with blog posts is that they all exist at different stages – and are more like mini-projects than To Do list items to be checked off.

    Now, I organise them as documents within Notion, like so:

    Each entry acts as its own ‘page’, which can contain notes, images, etc, and I can assign tags depending on the status of any particular post (from idea, to ‘in progress’, to completion).

    Again, doing this means that my To Do list is freed up and reserved for items which require action and completion in the short term – which brings added focus and clarity.

    Visibility

    Aside from the deeper meta-data capabilities that come with Notion’s database approach, there’s also something else which has proven to be invaluable, but also really simple… and that’s the visibility of the tasks.

    While hard to capture in a screenshot, all of my different lists or projects can be displayed on my home dashboard in a neat, logical, organised way.. with a custom view as appropriate. This means that instead of dumping things into ‘Anytime’ or ‘Some Day’ in Things and forgetting about them, I can keep certain projects or items on my radar – without them becoming too intrusive or overwhelming.

    Summary

    Things is great, but trying to use it as a master tracking utility for everything simply wasn’t working for me. Offloading the larger and longer term projects to Notion, and having Things focus on specific things I need to get done on a day to day basis has made a huge difference. Give it a bash. 

  • Gherkin 40% – (Failed) Keyboard Build Log

    Gherkin 40% – (Failed) Keyboard Build Log

    In the past I’ve posted about some of my DIY mechanical keyboard builds, including the first I attempted, the Commodore 64 homage. Around about the same time as that build, I had been seeing these ludicrously tiny keyboards online which were 40% the size of a standard setup… with just 30 keys total. Naturally, curiosity got the better of me, and I decided to have a bash at building one.

    The specific design I went for is known as the ‘Gherkin’, apparently because originally they were small and green. I wanted to stay close to this idea, and opted for a yellow colour scheme… Yellow PCB, yellow glow, yellow case… the works. There may or may not have been a splash of green in there. I wasn’t quite sure yet.

    The Parts

    I needed the following bits and pieces:

    • PCB
    • Switches
    • Keycaps
    • Diodes and resistors
    • A case
    • LEDs (for under the keys as well as to light up the case)
    • A microcontroller
    • IC Socket

    I couldn’t face soldering in all of the diodes and resistors by hand, so I got a PCB with them already in place from /u/MrMontgomery on Reddit. He also sent over the LEDs, and the microcontroller that I would need.

    For the case, I got a handmade yellow acrylic case from someone called /u/qlavier in Belgium. They make some beautiful things on their website, qlavier.com. I wanted an all acrylic case so the LEDs would really shine.

    The keycaps were standard DSA profiled that I got dirt cheap on eBay from Hong Kong. Sticking with the Gherkin theme, I decided to do an alternating green and yellow pattern.

    The Switches

    The switches, of course, deserve a special mention, due to how important they are when building a custom mechanical keyboard. In the last build I went with Cherry MX Whites (Milky), which are pretty ‘clicky’, but not as loud as most others of that type. For this build, I had in mind that the Gherkin might end up as a travel keyboard due to its size… and I wanted the switches to be quiet, but also have a really good tactile feel to them. On top of that, I wanted them to support under-key LEDs, and to have a clear top to diffuse the light as much as possible. So eh, not too specific.

    In the end I went with Kailh Pro Purple switches, which tick all of the boxes. They have a 50g actuation force, and aren’t quite as tactile as I might usually like, but they still feel pretty good. Plus, for some reason, in my head the purple colour seems to fit with the Gherkin theme. Don’t ask me why.

    The Build

    When I began the build, the guides available online were scant at best, and it was bit more complicated than the others I had taken on before. With advice from the folks at /r/mechanicalkeyboards I managed to figure things out in the end. However, ultimately it all became a nightmare, and I have shelved the project for now. Some specifics…

    LEDs

    First of all, you need to install the LEDs in place. This (perhaps obviously) is because they sit underneath the switches. The problem I immediately ran into was that I couldn’t find a schematic for the Gherkin PCB, and was unsure of what way the LEDs should go. MrMontgomery helped me out, in that the long leg of the LEDs goes into the hole with the round pad… and the shorter leg goes into the hole with the square shaped pad.

    Gherkin LED build log

    Switches

    These were pretty straightforward. Put the switches through the acrylic top panel, through the holes in the PCB, and then solder them in place. At this point I really wished I had paid more attention to getting the LEDs straight, as they didn’t all immediately fit in the hole in the switches casing. I had to carefully bend them a bit, but they worked in the end.

    Gherkin keyboard build log

    Reset Button

    This was another annoying bit. In order to flash the software onto the microcontroller, you have to create a connection between two of its pins to reset it into the required DFU mode. That’s fairly simple in theory… you can just solder two bits of wire to the necessary pins and then touch the ends together. In practice though, it’s a bit more of a pain. The reset function is something I found myself using a lot with my other custom keyboards, while you customise the layouts to something that works for you. This meant that I would have to find a way to easily trip the reset. In the end, I settled on a mini, yellow push button switch that just kinda flopped about. I toyed with the idea of an arcade button, but that would have been ridiculous, and wouldn’t have fitted in the case anywhere – at least not neatly. Of course, nothing runs smoothly… and the reset button didn’t work at all. For a while I had to resort to just manually shorting the pins, which was less than ideal.

    IC Socket

    Because of the design of the Gherkin, you need to install the Microcontroller after the switches have been soldered in. That causes some problems if you have a plate mounted case… or if you have any problems with the soldering that need fixed later. Why? Well, if you’ve soldered in the microcontroller directly to the PCB, you can’t get underneath it to de-solder the switches easily. For that reason, I was advised to use a (low profile) IC socket which the microcontroller just clicks into, so if needs came to it, I could just pop it out.

    Gherkin MCU

    With that in mind, I bought a 24 pin IC socket, trimmed it down to size (12 pins) and installed that. Unfortunately I immediately ran into some issues, as it appears the IC socket had gotten damaged somehow (probably when I trimmed it down) and the Pro Micro controller wouldn’t slot in properly. This turned into a bit of a saga, as it took me a bit of troubleshooting to realise that this was the problem.

    De-soldering the socket was a nightmare for the reasons above, so in the end I clipped it off and soldered the controller directly onto the board, at which point I managed to get everything working, aside from a few keys. After rummaging around online, I found this incredibly helpful image which helped identify which pin was the problem:

    Gherkin troubleshooting

    Unfortunately, by this point my Pro Micro had been so abused by soldering and de-soldering that it couldn’t be trusted. I had to remove it, and try another. In true grand idiot style, I then ended up going through a few different Pro Micros as I soldered the header pins in wrongly… lost the microcontroller in a house move, and various other mishaps.

    To top things off, I tried to remove a few of the switches to clean up the top side of the board a bit, and ended up breaking them. I put a new microcontroller on, and got things mostly working… (after realising I had forgotten to put the switches back on first… eugh).

    Ultimately though, I was defeated. A couple of the switches just weren’t working, even when I shorted the pins on the board directly. The only thing I could figure was that I had damaged the traces on the PCB somehow, and that would mean essentially starting from scratch, soldering in a whole new set of keys… etc.

    I’m pretty disappointed, as the Gherkin was shaping up to look pretty cool. However, it was a learning experience. I now understand what is and isn’t critical when building these boards, and have come to understand a lot more about how they actually work, which has been helpful. At the end of the day, the Gherkin was going to be more of a novelty board than anything especially practical, so I can probably live without it.

    That said… I’m not really good at giving up on things completely, and since I still have the custom case etc, I’ll probably return to this one at a later date. Watch this space.

  • How I replaced everything with Notion

    How I replaced everything with Notion

    Knowing my penchant for a productivity tool, my good friend Pazy suggested I investigate one that I hadn’t heard of before: Notion. From what I could gather, it was a central place to store a whole manner of different kinds of notes.

    I was initially a bit wary of diving head-first into Notion, as I have both used and built up a significant amount of content in Evernote over the years. However, the temptation was too much to resist, and I gave it a whirl. After just a short time, I was convinced. Notion is the promised land.

    Notion logo

    Coming from Evernote

    While Evernote has been touted as the single place that you can quickly grab and throw all of your various ideas, links, clippings, and files that you come across on a daily basis – Notion takes that idea a step further. Rather than just acting as a huge repository with search capabilities, Notion encourages you to store information in a far more organised way, making heavy use of its own databases. At first, I found this a bit confusing, as my Evernote ‘save it all’ approach didn’t quite fit neatly… but once I realised that Notion involved a fundamentally different approach to data organisation, it made much more sense.

    Databases versus Notes

    I can already hear people turning off at the sound of databases. I was the same. Pazy is a database guru as part of his day job, so I just assumed he was naturally inclined to gravitate towards databases in his personal life too. However, Notion utilises and presents databases in a way that you wouldn’t even realise they were there unless you stopped to think about it. Essentially, rather than storing information in a text-note, you are gently prodded to put it into tables, with tags – all of which is presented in a logical hierarchical structure. Before you know what’s happened, you suddenly have the ability to organise, filter, and display your notes in a much more powerful and diverse way than would have been possible with the alternative.

    To give a concrete example, as a musician I keep a note of tracks I have started working on, but which might not be finished. In Evernote, that looked something like this:

    Notion for song tracking

    and here is an excerpt of how it looks in Notion…

    Song List Notion

    Of course, Evernote can also present data in tables… but with Notion the key point is that the information is treated as a searchable database, rather than just text presented in a different way. With Notion, I can now quickly and easily see which projects are at which stage, and filter them depending on the different variables that I want to display.

    For another example, I used to collect recipes to give me ideas for what I could eat on days where I lacked inspiration. In Evernote I would collect these by meal type, but in practice I found that the limited ways to filter these outside of just a plain search meant that I almost never referred to them. Now, they are stored in a dedicated database in Notion:

    Recipe List - Notion

    Looking for a vegetarian dinner? What about an egg-based breakfast? Maybe just a gluten-free snack… It’s as simple as combining the tags and filtering for desired results.

    Recipes - Notion filtered

    So much easier than sifting through a huge pile of text-note clippings.

    Personal Workspace and Linked Databases

    One of the other most useful features of the database storage model over using text notes, files, or simple tables is that you can create ‘linked database views’ in different places. In other words, you can have one central database for a particular purpose, and then filter that database to display the relevant data for the appropriate section you are working in. That sounds a bit convoluted, but here’s a practical example. If I want to compile a Reading List of different blog posts, books, journal articles etc that I want to read… rather than having different databases for each area of my life (work, personal, music, language learning, etc), I can have the main database like so:

    Notion Reading List

    and then under a specific page, I can have a dedicated ‘view’ of that same database, presenting only the relevant entries. For example, here is how I have the Reading List set up to display on my dedicated Japanese learning page:

    Japanese Reading List

    Note that it isn’t just displaying a particular sub-set of the data (filtered by those articles tagged ‘Japanese’), but I can also choose how it appears on the page. There’s a bunch of different options including simplified lists, full tables, galleries, etc.

    As you can see, rather than creating a typical file structure where you collect pages and files or notes within a hierarchy of folders, Notion encourages you to put together what are essentially ‘dashboards’ of data. This means that on the top level you can display the data from the various collections underneath it – not just act as a blank ‘storage box’. This is an incredibly useful feature, which means you can set up different workspaces for different projects, or for different areas of your life… even if just to separate out work and personal items.

    Web Clipper

    Evernote’s Web Clipper tool is known for its ability to grab almost anything from the web and squirrel it away for reference – whether it’s screenshots, selections of text, full web-pages, or whatever else – so Notion has a tough act to follow in that regard. In practice, it isn’t as configurable on the surface, which is a bit of a shame. However, it is deceivingly powerful. Here is how it looks when saving an article from a site:

    Notion Web Clipper

    As you can see, there aren’t all that many options. On the bottom right you can click and search for the page you wish to import the clipping to – but not much else. What isn’t obvious though, is that Notion will grab various fields, and import them into the appropriate tables of a pre-existing database. That means, that it will save the URL into the ‘URL’ column of your Reading List table. This is really handy, as it means you have to do less leg-work when it comes to getting different kinds of info into your custom databases. Unfortunately, the extent to which you can modify this is fairly limited… (as in, to tell the clipper to save the URL to a different table field, etc) but hopefully that will come in a future update.

    UI and Page Formatting

    The UI of the Notion block-style editor is particularly nice. Emojis are littered everywhere, acting as icons or nice little visual indicators, and you can customise pages with images pulled from around the web. There’s even an Unsplash integration, which is a pretty great way to directly get access to high quality images for free.

    Unsplash Integration - Notion

    There is also a wealth of different ways to format the information on your pages and organise them as you see fit, including collapsible sections, different headings, etc.

    rich text editor Notion

    Anyway, you’ve all seen rich text editors before… but it’s worth saying that the options here are far more fully-featured than I would have expected.

    File Handling and Embeds

    It should go without saying, but embedding content from other parts of the web like YouTube is really easy. However, at first I thought that file handling in terms of uploads might not be so great, based on various reviews talking about how great Evernote was at handling all kinds of different file types. In practice though, this wasn’t really the case. While you have to purposefully create an ’embed’ block first and then upload your file to Notion for it to display inline (if you just drag and drop, it will create a download link instead) – it is still perfectly functional, handling PDFs, MP3s, etc.

    File handling Notion

    The one caveat here is that while Notion is free for personal use, uploading files larger than 5mb requires a paid account – which starts at 4USD per month for an annual subscription (or 5USD on a monthly basis).

    How I use Notion

    Years ago I helped create a Wiki style ‘portal’ for a company that I worked for. The idea being to serve as a central Intranet dashboard full of links, news, and other resources that folks might need. The software we used wasn’t exactly up to scratch, but it got the job done. If Notion had been available back then, it would have fitted the bill perfectly – and that’s one of its major strengths.

    Instead of having all different kinds of data stored in different services that I inevitably forget about (Pocket, Evernote, Google Spreadsheets, etc), I now have a single personal ‘portal’ which displays a whole bunch of stuff that I need and use on a daily basis – or simply want to be reminded of. Links to commonly used sites, goals for the year, habits I want to track, articles I want to read, etc. There’s so much information collected and organised in the one place that it’s hard to show just what I mean, but here’s something of an insight…

    Notion homepage

    Having everything I need organised and presented in this way, where I can see the status of a bunch of different ongoing projects at a glance, and dig in deeper into the sub-pages for more information as required has been really liberating. Instead of just chucking every little thing I find on the web which might be useful one day into vaguely defined categories in Evernote (which never really worked very well), I now have things much more neatly defined, and feel so much more organised. It has lifted some kind of low-level mental pressure around accumulating so much data that I would never be able to find again because of its haphazard nature.

    Conclusion

    I really didn’t expect to take to Notion in the way that I have. While it did initially take some adjustment to understand its core kind of usage philosophy, and a bit of time to set up and input my data in a way that made sense for me, it has replaced and improved on so many different areas of my daily workflows that I can’t imagine going back to Evernote.

    Ultimately, the data that I save is now far more organised, far easier to access, and much more useful than it ever has been before as a result. I would definitely recommend it to anybody interested in keeping track of their digital knowledge base.

    There is so much more to the app than I can squeeze into a single post, including the ability to manipulate or query the databases via scripts, etc… and so I’ll post a few follow-ups with specific use cases for more details.